Monday, July 18, 2016

Fresh Fruit Trio

Yesterday, while playing with some samples for the class tomorrow, I had one of those "hmmm..." moments. I don't think I'd be the first to look at the flower in the Fresh Fruit by Stampin'Up! stamp set and not sort of see citrus segments...in fact the Designer Series paper of the same Suite has one side of lemon slices...Adding the peach outline stamped and rotated 3 times adds a nice 'rind' ~ and with a little imagination and the right colours...I think we can create a passable citrus slice from the set!
It was late by the time I'd stamped and punched, so I turned to pinterest for a layout I liked and found a perfect idea from Linda Callahan, using the Apple of My Eye set from last year. I especially loved that she used the blue card base...really gives a pop to the citrus, I think.

 I saw a great take on a layout challenge from Mojo Monday. I had fun adapting the layout with the new things!


And another card I put together, last night came from wanting to use the scribble background from You've Got This Stamp set,  I thought I'd like to try a card with a cutout of a pear...and thought it would look nice layered onto that great scribble background. I made a couple attempts at adding the accent of pink onto the pear, but happy with the way it looks...and I was pretty happy with the size and font of the word Amazing from the new Marquee Messages.


I think we are going to have fun at this class. One of my gals made fresh jam last week and offered to bring along a jar with some cream if I made the scones...so I'll be baking tomorrow for the class!

smiles,
Laurie


Saturday, July 16, 2016

Night Owl

So last night about midnight, I started creating! I was planning on just having my last cuppa tea and figuring out what I would put together today...but when I saw this card from Carolyn Bennie I had to pull out the stamps, thinking to myself, I'll just see if the pieces will work with this new 'simplified' version of Magic cards with 'outline' stamp sets. I love a couple sets we have that are really easy to create the layered look of these magic cards without a stamp-a-ma-jig.
 I'd promised one of my customers to pull out the Playful Pals as an example...but wasn't sure about the sizing!
I'm really thrilled with how this worked out in the wee hours of the morning...not being able to stop as each piece came together.  (I might still put on some stars on the front...what do you think?)
The saying 'inside' came from Endless Thanks and 'hoot' came letter by letter from an older Hostess set Express Yourself...the new little Labeler Alphabet could have worked well here, without needing my stamp-a-ma-jig at all! And that sweet heart came from the Endless Thanks, too, and added a perfect accent to the sentiment!
On the outside, I punched out the Tree from Tree Builder punch but needed a bigger version to fit across and not interfere with the slide, so I placed the punch-out over another piece of paper and just cut around it. Using the Sprinkle of Life stamp set, I decided to stamp the tree/branch on the coloured piece...and then I was pretty happy to read the little saying from that set, while trying to work out what to do with  the large open space at the bottom of the card! ~ it's like they went together on purpose, right!?


smiles,
Laurie

Thursday, July 14, 2016

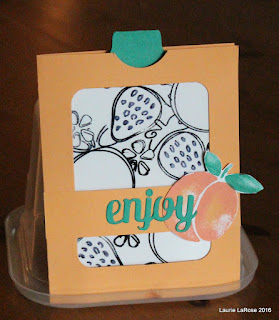
Fresh Fruit Magic Card

I've been playing this week with a Magic card! Planning a class with it this next week.
The first is featuring the fabulous stamp set Fresh Fruit! Another one of those sets I knew I needed right from first glance into the pages of the Annual Stampin'Up! catalogue for this year!

Brandi Barnard's video for Stampin'Up! shows one way to put together this 'slider' type card.

I've made these a couple times in the past for classes and have another way of putting them together that I found on Splitcoaststampers Resources. And this time I adapted yet another version combining all techniques I saw while trying to figure it out!

I liked the way Brandi used the Fresh Fruit, so used that idea to do mine.

and then for the magic of the card... pull the tab!

I love all the bright cheeriness that this set creates! Viola! 


Smiles, 
Laurie

Tuesday, July 5, 2016

A Model card from the Runway


Inspired by a clip I saw earlier today of runway models wearing designer dresses~ in our new In Colours...Sweet Sugarplum and Peekaboo Peach...lots of chiffon, and silver overlay and rosettes.


What do you think? 

From the minute I saw the catalogue, I knew I needed the swirls from the Swirly Bird die collection. I adore them and think they are very versatile! I wasn't as sure about the set, but sure like the touch of inked colour the little flowers bring to the design of a card!

I used the Large Polka Dot embossing folder on Smoky Slate cardstock, then using a glue pen, I covered the raised dots with glue and sprinkled with Stampin'Up! Silver Glitter. One of the dresses had a chiffon skirt with silver polka dots...another dress had a bodice of the swirled rosettes in cream, I sort of like them together!

smiles,

Laurie

Saturday, March 26, 2016

Hoppy Easter!


Busy colouring eggs last night and putting out our baskets. We had some great intense colours to play with this year as my girlfriend was cleaning out her cupboards and shared these pretty dies with us.


Always fun to see how the eggs will turn out each year.
Hope you're enjoying your weekend!


smiles,
Laurie

Monday, March 21, 2016

Scrapbook and Cards Today Saturday blog post


One of my favourite blog posts to look forward to each month is the great Guest post on Scrapbook and Cards blog. There is always beautiful inspiration. This month is no different! ...and I love the versatility shared from the Botanical Blooms die pieces!

Enjoy the read!

smiles,
Laurie

Friday, March 4, 2016

Designed by Me

Well, I've been busy this week creating a few different things to submit to Stampin'Up! for consideration to be chosen as a Display Board Stamper for an upcoming event OnStage Live in Salt Lake City in April. I'm a great CASE'r, tweaking cards as I put them together to add my own touch, but had to steer clear of the Boards this week and play. It was fun thinking about it through the week and coming up with things that were my own.


We were to submit 3 cards. I love fancy fold cards, so I included this 4-step card. It looks great coming out of the envelope, all those flowers in layers ~ and then opens into  a neat card to display.

We were to do two 3D items...Hard to decide what to do...I love making banners and garland, samplers for each season or any reason. Wreaths, wall hangings with flowers. The Mini Treat bag and new Baker box have been fun classes. After looking for a photo to do the scrapbook page, I saw a bunch of photos from a trip last year...and decided to make this little accordian book. (a bit difficult to photograph). I worked with  the Happiness Is Project Life Accessory kit, available on the Clearance rack. I loved the little pockets for this album. I made a fun memory snippet of our summer.


The other 3D item(s) are the Curvy boxes. I've made a menagerie of animals.


And the final entry is a scrapbook page. I fussy cut flowers from the fabulous Birthday Bouquet Designer Paper pack. Stamped a bit with Timeless Textures stamps on the background paper from a SAB paper pack to add a bit more layer to the already swirly paper.


Thank you for taking time to look through these samples.
I'm pretty excited about heading down to SLC in about a month! It's going to be a fabulous event!


smiles,
Laurie

Tuesday, March 1, 2016

Tin of Cards Variations

The Tin of Cards is such a great idea...a beautiful kit.
And on sale this week!
I held a couple classes about a month ago. I made these cards, offering a couple alternatives for the ladies to create or be inspired by.


Using some pieces from the kit and stamping with Staz-On with one of the wonderful SAB sets.
Having used the acrylic on this card, I replaced it with some of the vellum from the wonderful SAB pad of vellum that matches the beautiful Botanical Blooms from the Occasions catalogue. It's not captured well in the photos but I stamped in Crumb Cake the Corner Garden background stamp to layer the blooms over. Easy, simple. It would be fun to add more layers of flowers.


Another wonderful image from a SAB stamp set. So simple, just embossed the sentiment and a couple little flowers scattered around in gold onto one of the wonderful card blanks from the kit. Used one of the butterflies that also comes in the kit.


smiles,
Laurie

Sunday, February 14, 2016

Happy Valentine's Day

We love Valentine's around our house!
This year I decided to throw together an impromptu drop in class on Saturday for kids to come create a simple banner to decorate their homes. We had a fun time!

Already planning an Easter theme banner...should do it sooner than the day before the big day!


smiles,
Laurie


Friday, January 15, 2016

Artisan Sampler


I was asked to do a custom class for a Bridal shower recently. We toyed with the idea of cards or home decor idea. I've really been enjoying the sampler I made of our Costa Rica trip (see this post) , so suggested that idea. 
When I saw the Artisan Embellishment kit on sale on the Clearance rack, I decided to buy those and use them as the starting point for putting this together. Mostly current stuff otherwise, along with the Clearance kit..and a favourite stamp from many years ago (Delight in life ~ how can you not!)
The kit has all the great buttons and I pulled stamps from several sets to fill in the squares.
It took a bit longer to put together than we thought, but the ladies seemed pretty happy with their results. I love the Blackberry Bliss as the strong feature colour. 


smiles,

Laurie


Saturday, January 2, 2016

Snowy Banner


Putting up this snowy-scape banner again this year...might need to update it with a classic Let it Snow saying...maybe next year!


smiles,
Laurie